Tuesday, December 11, 2007

A Pretty Emboss Resist card... and a teaser


Hi, Everyone. Well first of all I have to give a little teaser for the new catalog. Some ladies from Canada have received their complementary copy of the new catalog and posted sneak peaks from it. You are going to love, love, love it. I have to be quite honest that I wasn't totally thrilled with the Fall/Winter catalog. Not much that was new, too many flowers, etc. But this new book should thrill you. Lots of new stuff, great occassion sets for birthdays, weddings, graduation, baby, kids, etc. Lots of new accessories like rub ons, chipboard sheets, bead sets, glitter sets, striped ribbons, great new collections series, new punches, beautiful new designer papers. Need I say more. Hopefully my copy gets here before Christmas. Now how do I ask for stamping money for Christmas. And there are a ton of things I want from Papertrey Ink too. Oh, I am in trouble.

Anyway, here is a cool card I made tonight. Now it is very similar to a card I posted last month. I loved the layout, elegance, and simplicity of this card, so I had to use the same thing for this technique. Plus I don't have a lot of stamps this technique would work well with, so here it is.

How do you do the emboss resist technique?
1. You cut your glossy cardstock (must use the glossy for best results). Then take your embossing buddy to take the static off the glossy cardstock.
2. Stamp your image with Versamark ink on the glossy cardstock. I layered another image on top of this with basic black CRAFT ink. Now if you look at the black image closely you'll see that the underlying image I stamped with the versamark sort of resisted this ink. (oooh, that is another resist technique too) Not to worry, it isn't too noticeable.
3. Pour on the clear embossing powder, tap off excess, and heat emboss.
4. Use a sponge to color the cardstock. I smudge it at first to get full coverage then I go over it with pounces to get a more stippled effect.
5. Buff the piece with some tissue to wipe the ink off the embossed part, and voila!! Isn't it soo pretty?!!

I thought I was pretty clever in layering the images. Mostly you'll just use one bold image and clear emboss that and then color the cardstock whatever color you want. But I just knew this would work with this Garden Silhouettes set. Hmmm. I was right. That doesn't happen very often.

Have fun trying this technique. It is fun and easy and gives a good Wow! factor.

Friday, December 7, 2007

New Hostess Level 3 Set Preview


Stampin' UP! sent all of their demonstrators this new Level 3 Hostess set from the new catalog that comes on Jan. 1st. Wow!! They are so good to us in giving us lots of free stamps. It contains lots of flowers, a couple of sentiments, this heart image, and a butterfly image. While it isn't a stamp set I would have chosen to try to get, it is always nice to get free rubbah!! And as with all my other stamps, I am trying to use what I have, so here is one card I have made for this. I am doing a training class for the girls in my downline this coming week. I am going to be showing them a few resist techniques. This one uses a crayon resist technique.

Here is how you do it:
Stamp your outline image in basic black ink on GLOSSY WHITE paper. Next you take a white crayon (you can use a watercolor wonder crayon, but it doesn't work quite as well), and color in all the parts you don't want to take the ink. I did the flower and the double line edge of the heart. Now you brayer on your ink or use a sponge. I used Purely Pomegranite. Then you take a tissue and wipe off the ink off the crayon. Voila!! It reveals a white detail. When you buff the image with the tissue it takes off the crayon, so you could go back and color in the white part that it leaves with a marker in a different color. I'll try to show that in another post. It is pretty easy. I then stamped the small flowers on the card base in black and put the white accents on with white gel pen. I love that gel pen. Best one I have ever owned, and Stampin' UP! sells it. Woohoo!!
I must say that I tried to put a sentiment on this card after I had stamped the small flowers. Not a good idea. The sentiment needs to be at the bottom right corner, but alas I goofed. I then attempted to put a sentiment at the top and it looks quite horrible. Sorry. My sample for my girls will be much better.

Fall Flowers cards


I made 18 cards with this paper very quickly. All the designer papers were cut to the same size and just layered differently. Most of the papers used had the two patterns on the same sheet. So I cut out the larger layer first then cut out the smaller piece second and just had a small piece left over. Now that is what I call paper savvy. These cards are 6x3 1/2, and are soft sky, really rust, and groovy guava. I used Papertrey sentiments, and My Sentiments Exactly alphabets. I made these as part of Christmas gifts for a few people.

Wednesday, December 5, 2007

One last Piece of Cake sample for now


So I am very busy making Christmas presents, and the cards I have posted lately have been for that. I like to give a variety of cards in sets for folks, but I was low on birthday cards. And I have been promising to use the Eat Cake set in a card class kit, so I was trying to do something with that as well. Anyway, here is one more Piece of Cake set card for birthdays. There are other images in this set for weddings too. I'll have to get to those later. They are great.
This one uses long notes again in cool caribbean and taken with teal, as well as kraft paper. I used craft inks on this whole card as they layer over the kraft paper and other colors better. Now on to some cards with monograms, which Papertrey has some great new monogram alphabet sets. I don't have those yet, but they are on my Christmas wish list. Hope to have them after the holidays are over.

Monday, December 3, 2007

Papertrey's Piece of Cake


I love this set from Papertrey Ink. You have to check out their stamps. Nicole Heady used to be a Stampin' UP! demonstrator, but now designs these great new acrylic stamps for Papertrey Ink. See my sidebar for the website link. Anyway, she makes these amazing stamps that are truly two step stampin that you can actually line up. It is amazing. Being a pastry chef, I had to have this set. I love it.

I used long notes, perfect plum, pale plum, lovely lilac, and elegant eggplant for my colors, as well as white and close to cocoa for cake colors. These are pretty and fairly simple.

Sunday, December 2, 2007

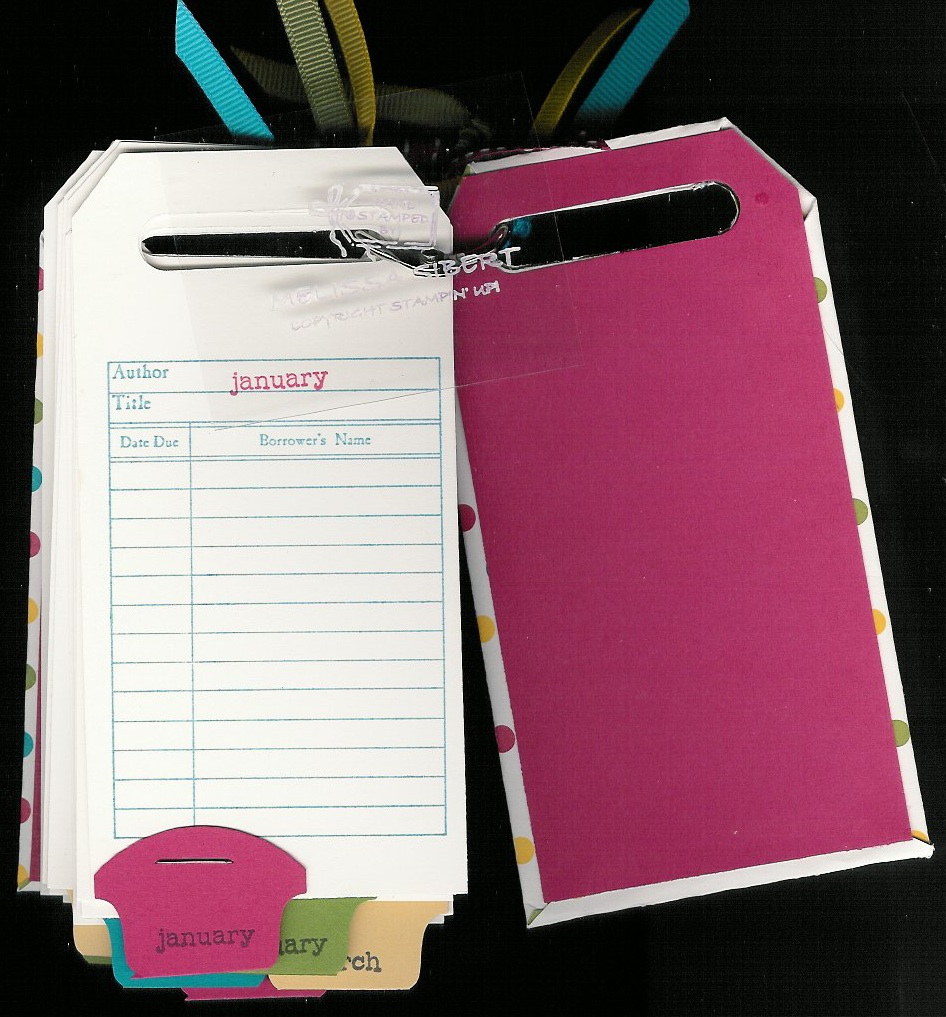
Birthday Reminder Tag books


Here are two Birthday reminder books. They are for keeping up with birthdays for each month of your friends and family. I don't know about you, but I find it is hard to rewrite all the birthdays from year to year on the calendar. So this is the solution. It doesn't need updating each year, unless you gain new friends and family members. But they can just be added to the pages of this book. You can stick it in your card box with all those handmade (wink! wink!) cards you have made to send out this year. Pretty cool, huh? I can't claim this idea as my own. I first saw it on Valerie Stangle's blog. She is pretty creative.

supplies: confetti simply scrappin', day to day flexible phrases (retired set), stamp of authenticity, round tab punch, cropadile to punch out the holes, ribbons, and thin cardboard (but our chipboard accents kit has the tags already for you to use as the cover and back cover). Can't get any easier than that.

Dimensions are 5 x 2 5/8" for the tag covers, and the pages inside are 5x 2 1/2. You can get twelve inside pages out of two sheets of regular cardstock. I cut the round tab punch outs in half and just stapled them to the pages. Saves time and paper.

Saturday, December 1, 2007

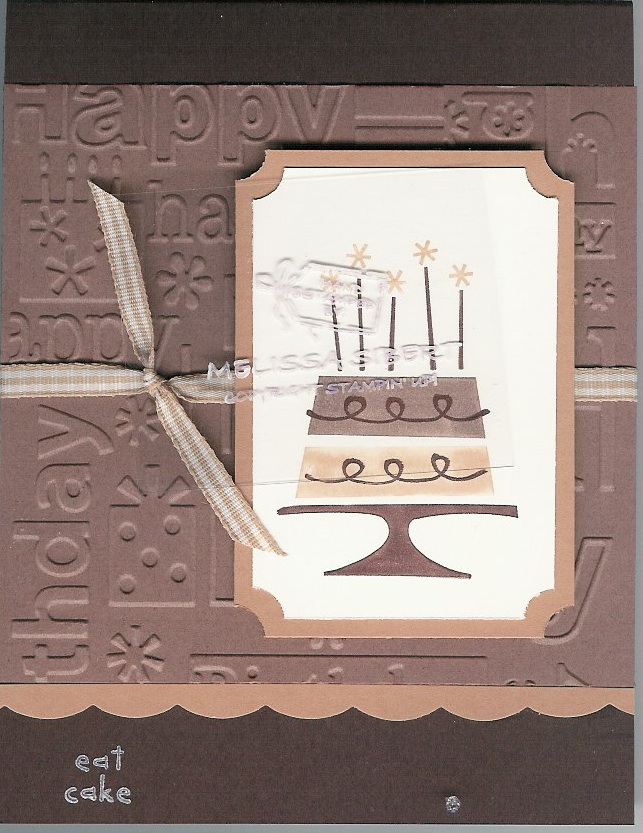
More Eat Cake cards


Here are some more cards with the Eat Cake set. Fortunately it is not a set that is retiring with the release of the new Spring/Summer Occassions Catalog. It will be here in Jan. so make sure you stay tuned, and get a copy reserved for you now. I sell my catalogs for only $5. I would love to get one to you.
These cards are pretty basic and don't take a lot of time to do. They use a variety of colors, some simple accessories, and a variety of the stamps from the set.
I used chipboard letters from the Lots of Letters chipboard set, and on the brown card I used my Cuttlebug with the Happy Birthday embossing folder, which was a perfect fit. Large eyelets, brads, ribbons, ticket corner punch, and the Confetti simply scrappin' kit round out the things I used on these cards.